
You have registered a new domain name, but you dont want to point your nameservers on your hosting provider. Wouldnt it be professional and stylish if you have own dns nameservers ns1.yourdomain.com and ns2.yourdomain.com! You can setup and run your own bind DNS server if you have a VPS or dedicated server with atleast 2 IP Addresses. Most domain registrars compulsarily ask for two nameservers.
I am writing this tutorial keeping it as simple and easy to understand, as DNS concepts are quite difficult to understand and are only limited resources on the Web. One would reckon that DNS is quite regardard as invisible force on the Internet without which everybody would be typing Ip addresses on the internet without names. .It isnt that hard to run your own nameservers and can done with command line on linux!
What is Required
Make sure you have backup of all important files before you proceed with this tutorial
To setup and run two nameservers for your domain domain.com
ns1.domain.com -> 11.33.55.77
ns2.domain.com -> 22.44.66.88
It can be even dns1.domain.com and dns2.domain.com. I am using nsX format as i am so used to this name.
I am assuming that you have registered your domain with domain registrar GoDaddy.
Whenever you type a domain name in your browser, the browser contacts the DNS nameserver of your ISP, which resolves to IP address for the corresponding domain. It is the A record in the zone file that responsible for this Notice that it would be an IP address entry..

Take a look at the zone file and carefully notice how A record is specified
Tip!
If there is an entry like
IN A 11.33.55.77
which in turn means
domain.com. IN A 11.33.55.77
This is often called short form for writing a zone file
Below is the zone for a the domain name. You can also make changes and edit the domain and IP address in the file.
; Sample Zone file for example.com
Domain template.
; You can just replace the domain.com and IP for your zone file
$ttl 14400
domain.com. IN SOA ns1.domain.com. webmaster.domain.com. (
1211542297 ; Serial in YYYYMMDDXX (XX is increment)
10800; refresh seconds
3600; retry
604800; expire
38400; minimum
);
;A record for domain mapping
domain to IP
domain.com. IN A 11.33.55.77
; Specify atleast 2 nameservers
domain.com. IN NS ns1.domain.com.
domain.com. IN NS ns2.domain.com.
; Map 2 nameservers to IP
addressess using A record
ns1.domain.com IN A 11.33.55.77
ns2.domain.com IN A 22.44.66.88
; Specify subdomains if any
using CNAME or alias.
www IN CNAME domain.com.
ftp IN CNAME domain.com.
; Mail exhanger and map it
IP using A record.
domain.com. IN MX 10 mail.domain.com.
mail IN A 11.33.55.77
For more information, see Common DNS Misconfiguration Issues
I have 2 IP addresses on the same server. In this case you will be able to run as a master dns server - no redundancy i.e if your dns server goes down, your site cannot be reached.
Inorder to setup a nameserver you have to edit the file and specify zone information
in your /etc/named.conf
Zone files are placed on /var/named with usually with file
name domain.com.db
zone "domain.com" {
type master;
file "/var/named/domain.com.db";
};
nano /var/named/domain.com.db
Include the following lines in the file (replace domain and IP)
$ttl 14400
domain.com. IN SOA ns1.domain.com. webmaster.domain.com. (
1211542297 ; Serial in YYYYMMDDXX (XX is increment)
10800; refresh seconds
3600; retry
604800; expire
38400; minimum
);
domain.com. IN A 11.33.55.77
domain.com. IN NS ns1.domain.com.
domain.com. IN NS ns2.domain.com.
domain.com. IN MX 1 mail.domain.com.
ns1.domain.com. IN A 11.33.55.77
ns2.domain.com. IN A 22.44.66.88
www IN CNAME domain.com.
ftp IN CNAME domain.com.
mail IN A 11.33.55.77
Thats it! Your private nameservers for your domain are ready!
> rndc reload
> service named restart
Type your domain http://domain.com and http://www.domain.com and you should see the domain resolving to IP address. To test your domain name for proper nameservers, go to dnsstuff.com and pingability.com
If your server setup is based on scenario 1, then you need not do anything extra.
I have 2 IP addresses from one hosting provider and other 2nd IP with other hosting provider, spread over two geographical locations. Both systems running Bind.
In this case i would be setting up 1 DNS server as master with first IP and on the other dns server, i would be running as slave dns server (2nd IP). If your master server goes down, slave would still work and thereby your site will resolve!
ns1.domain.com -> 11.33.55.77 (master)
ns2.domain.com -> 22.44.66.88 (slave)
Master Server
Go to the master server running bind. I am assuming that the master is with IP address as 11.33.55.77
nano /etc/named.conf
zone "domain.com" {
type master;
file "/var/named/domain.com.db";
allow-transfer {22.44.66.88;};
allow-update {none;};
};
Zone file
$ttl 14400
domain.com. IN SOA ns1.domain.com. webmaster.domain.com. (
1211542297 ; Serial in YYYYMMDDXX (XX is increment)
10800; refresh seconds
3600; retry
604800; expire
38400; minimum
);
domain.com. IN A 11.33.55.77
domain.com. IN NS ns1.domain.com.
domain.com. IN NS ns2.domain.com.
domain.com. IN MX 1 mail.domain.com.
ns1.domain.com. IN A 11.33.55.77
ns2.domain.com. IN A 22.44.66.88
www IN CNAME domain.com.
ftp IN CNAME domain.com.
mail IN A 11.33.55.77
Slave Server
Making slave can be so easy! Go to the other dns server and open the named.conf file. You need not create any file as the slave will automatically download the master zone information through zone transfer. After sometime, you can view the zone file!
nano /etc/named.conf
zone "domain.com" {
type slave;
file "/var/named/slaves/domain.com.db";
masters {11.33.55.77;};
};
Note: Bind will not allow you to run master and slave on same server, eventhough you have 2 IP addresses
Thats it! Your both master and slave are ready. Make sure you test your name server configuration with rrLookup.com or IntoDNS.com
Test the working of slave by shutting down the dns bind on master server.
It is always a good idea to add SPF (sender policy framework) in your zone file. More information can be found in openspf.org. If you dont add SPF record in your zone file, it could be possible that many providers like AOL, Hotmail could interpret all mails originate in your server to be spam and placed in junkmail folder. Many ISPs and email providers check for SPF record pass to determine whether the mail originates from your IP.
domain.com. IN TXT "v=spf1 a mx -all"
OR
domain.com. IN TXT "v=spf1 a mx ip4:11.33.55.77 -all"
Lets say you have 3 WWW servers and you want to distribute the load through round robin dns, so that each server will get 1/3 of the request. Just specify multiple A records pointing to IP address of WWW servers. All this can be done in the zone file. /var/named/domain.com.db
www IN A 1.1.1.1
IN A 2.2.2.2
IN A 3.3.3.3
IN A 4.4.4.4
To test this, do nslookup domain.com and you should be able to get IP records by round robin
nslookup domain.com
So far we have done is dns forwarding! Which is when somebody queries for domain.com it resolves to IP address. But what if they do reverse? Querying for IP address to check whether that IP belongs to domain.com It is necessary to setup reverse zone for your domain. If you dont have reverse zone setup most email providers will disregard email originating from your server as spam.
Note: Simply setting up reverse DNS in zone file will not delegate your IP as authotitative for your domain. Since your hosting provider owns those IP, you have to ask them to setup reverse pointers to your domain. In most cases your host will be able to setup reverse dns for your IP.
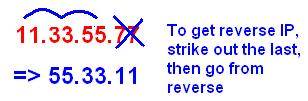
nano /etc/named.conf
zone "55.33.11.in-addr.arpa"
in {
type master;
file "reverse/55.33.11.in-addr.arpa";
};
Next, create a reverse zone file.
Important: PTR records are used to create a reverse entry
nano /var/named/reverse/55.33.11.in-addr.arpa
Place the following contents in the file.
$TTL 14400
@ 86400 IN SOA 55.33.11.in-addr.arpa. admin.domain.com. (
2008011904 ; serial, todays
86400 ; refresh, seconds
7200 ; retry, seconds
3600000 ; expire, seconds
86400 ) ; minimum, seconds
domain.com. 86400 IN NS ns1.domain.com.
domain.com. 86400 IN NS ns2.domain.com.
77 IN PTR www.domain.com ;
77 means 11.33.55.77
.....
.....
Thats it! Dont forget to increment the serial no by 1 whenever you make changes.
If you have installed bind9 in centos 5 using yum, it probably does not come with named.conf. All you have to do is create /etc/named.conf and insert few lines...
options
{
/* make named use port 53 for the source of all queries, to allow
* firewalls to block all ports except 53:
*/
query-source port 53;
query-source-v6 port 53;
// Put files that named is allowed
to write in the data/ directory:
directory "/var/named"; // the default
dump-file "data/cache_dump.db";
statistics-file "data/named_stats.txt";
memstatistics-file "data/named_mem_stats.txt";
};
Common DNS Misconfiguration Errors - http://corpocrat.com/....dns-misconfiguration-errors/
DNS checkup Tool - http://www.intodns.com
Using Dig for Solving DNS Related Problems - http://corpocrat.com/..../using-dig-tool-for-dns-lookups-and-nameserver-query/
Back to home
You can also place comments in my blog!